There really isn’t much to write about this one – it’s just a post-install guide. This laptop has been out for over a year now, and the newer kernels support pretty much everything. Going back to my previous post about Fedora on this machine, there isn’t nearly as much to fix. I know this is a little late…especially with Fedora 24 coming out in a little over a week, but nonetheless here it is.
In my previous post I outlined my reliance on Windows lately, and it really got me to thinking, so I decided to switch my laptop back to Fedora. My original reasoning was to use Windows on the laptop to have access to Lightroom for my (very amateur) photography needs, but I realized over the past year I rarely edited photos on it, as I prefer the large screen on my main machine.
Before my list of tasks, I’ll go through some of the changes. After that, a good deal of this will be pasted verbatim from my post from last year, maybe with a few notes added.
Backlight buttons work out of the box.
No ACPI settings, no terminal commands…the function keys work beautifully.
Desktop scaling is largely the same, and dependent completely on Gnome’s settings.
I’ll outline (again) the settings below so that you can get it looking usable on a 1440p screen.
Kernel support for this machine’s wireless card has been drastically improved.
Over the course of two days, I have noticed little to no problems with it. No dropped connections, even on 802.11AC.
Yum has been replaced with dnf.
Dnf has a new capabilities that yum didn’t, such as simultaneous package downloads…usage is still pretty much the same, but it will run a little faster. You can also use the fastest mirror plugin to speed up processes using dnf.
So here’s my setup procedure – take or leave parts of it as you wish:
One note: this notebook features a “fn-lock.” If the lock is not on, the F keys are mapped to their intended uses, i.e. volume changing, brightness, etc. Press fn + esc to lock them to regular F-keys. In Linux you will likely use them much more than their other purpose. This means you have to now press fn along with the key to do something like change the volume, whereas before you would have to press fn just to get the regular use of the F-key.
Backing Up Your Existing Operating System
In my original article, I talked about using Windows 8’s backup image feature. I don’t mess with that anymore. First off, I was running Windows 10 up until a few days ago, and Fedora before that…I found a solution that is platform-independent. I have been using Clonezilla for a while. It’s super easy to use – especially if you have a spare USB drive laying around. It supports recording disk images to a local disk (easiest) as well as network locations, including Amazon S3 storage (slightly more complicated).
I have several hard disks laying around, so it was a no-brainer to use the local disk image functionality. I’m not doing to go into how to do it in this post, but the instructions that walk you through the process are very understandable. Just download the image from their site, write to a USB key (or DVD if you prefer, and are using a computer with an optical drive), boot, and go through the process. You’ll record an image of the entire disk which you can then restore at any time. I’ve gotten in the habit of using it on all my computers before I make an operating system switch or something of that nature.
Booting from the Fedora USB Key
With Fedora 21 I had some trouble with this…it was finicky about which utility I used to write the USB key…I didn’t run into that problem with F23. I don’t know why, but I haven’t found a method on OS X that is both reliable and easy, so I’m going to list what I use for Windows and Linux. Just download the Fedora 23 image from getfedora.org and use whichever of the below applies:
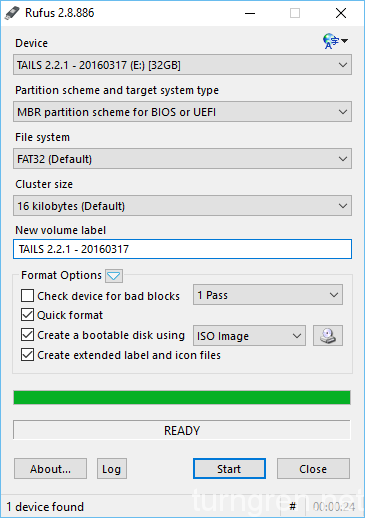
For Windows, I use a utility called Rufus. It’s amazingly simple, and works every time. Just point the utility to the disk image (iso) you downloaded, select the USB device, and press “start.” In 5 or so minutes your USB key will be ready. (Image from Rufus’ website.)
For Linux, this has gotten simpler, at least with Gnome. (I don’t have anything against KDE/XFCE/etc., but am most comfortable in/used to Gnome, so I’ll put the instructions here for that.) Gnome has a newer feature where you can just right-click on an iso and click “open in image writer.” It will then write the image to the USB key and you’re good to go.
For Mac, many people suggest the utility unetbootin, but for some reason I have trouble on multiple computers to boot keys made with it. I’m sure it’s something simple that I’m doing wrong, but with a Windows or Linux machine handy, I honestly haven’t had the incentive to figure it out. I’m lazy (or is it efficient?).
Fedora 21 Installation and Partitioning
From my previous article:
The partitioning tool in the Fedora installer is a little weird to me. The automatic partition option only looks at free space, so you have to use an option that says “free up additional space.” This allows you to blow away the existing partitions. But you will probably want to then use the “partition myself” option, as the automatic partitioning for me (128GB SSD) sets a HUGE root partition of 50GB, leaving much less space (after swap and EFI partitions) for mount point /home. So what you can do is either do the automatic option, free up space, then use the custom partitioning to adjust the root partition down to 20GB, then use more space for /home, or you can exit the installer, use gparted to blow away all the partitions, and start the installer again.
Alternatively, you could put everything on the root partition. I chose to not do this, as I could keep my entire home directory (and associated settings) and try a different distribution if I wanted to, by simply overwriting the root partition. I used 500GB for EFI/boot, 8GB swap, 20GB root, and all the rest of the space went to /home.
I no longer really care about this as much as I used to…between upgrading my X1 to a 500GB SSD, and noticing that I never fill up the home directory, I just click automatic partitioning and be done with it. You’ll still have to get rid of existing partitions. I’m not going to get into LVM/basic partitioning/btrfs, because I don’t have a need to…they each have some advantages, but for my usage the defaults are fine.
Adding the fastest mirror plugin to dnf
Edit /etc/dnf/dnf.conf in the editor of your choice (vi is the only terminal editor installed by default, and gedit is a graphical editor that comes with gnome. The example below, for simplicity, uses gedit). You will need to do this with sudo privileges. First, open the file:
sudo gedit /etc/dnf/dnf.conf
And add the following line to the end of the file:
fastestmirror=true
Updating Fedora to the Latest Packages and Stable Kernel
Run this to update everything, then reboot:
sudo dnf update
sudo reboot
Depending on your connection speed, this could take 5 minutes or much longer. Mine went pretty quickly. Reboot to make sure everything installed correctly, and verify you are running a new kernel (4.5.something at time of writing) by running the following in the terminal:
uname -r
Installing Gnome Tweak Tool
The gnome-tweak-tool package is really useful…it is the first step involved with turning Gnome, which is sort of locked down, into a somewhat customizable desktop environment. Many of the settings I change in the tool I couldn’t live without. To install:
sudo dnf install gnome-tweak-tool
I’ll refer to this tool for other things, but the first things I do are to go through the options. I enable the minimize and maximize buttons, change the color scheme to dark, and install a few extensions. (Dash to Dock is one of my favorites.) I also map the terminal to Alt-Return, and you can map the terminal of your choice…I prefer Terminator, to which I will refer below. Note: You need to have Firefox installed to use extensions. Firefox is installed by default, but if you use a different browser and wish to remove Firefox, you’ll want to do it after adding your extensions.
Installing Guake, a Drop-Down Terminal
I think Guake is one of the best Linux apps out there. It is mapped to your F12 key, is quick, looks good, and is customizable. We are going to install it and then set it up to run at login, so it will always be available. To install:
sudo dnf install guake
Now add it as a startup application in gnome-tweak-tool. The command is simply “guake” and you can put in any additional comment you want. Once you add it to startup applications you can access a terminal at any time just by pressing F12. This goes into effect after either rebooting or logging out and back in…if you want to try it out before then, press alt-F2 and type the command “guake” and then it will be available when you press F12.
Desktop Scaling in Gnome Desktop
Gnome by default seems to recognize that this is a high-DPI screen and uses it’s limited scaling capabilities. Basically it just doubles everything. I find that this is too much…you lose out on a lot of the screen real-estate that you have.
In order to fix this, you need to do 3 things…set the scaling factor to one in gnome-tweak-tool, set the gnome scaling in gconf-editor. (This seems redundant, but necessary to fix themenu size.) Change the text scaling to 1.1 in gnome-tweak tool. The scaling factor being set to 1 makes everything small, and I found that setting the font scaling to 1.1 is a happy medium. The text is still small enough that it fits within all of the UI elements, but is a bit larger and easier to read. Any larger and you’ll find that folder names like “Documents” won’t all fit on one line and will look funny. To accomplish this, you need to install gconf-editor in addition to the tweak tool installed above.
sudo dnf install gconf-editor
Open the tweak tool first. There you can go under windows, set the scaling to 1.0, and set the font scaling (under fonts) to 1.1. This takes care of most of the scaling, but there is still some persistent scaling issue with the activities pane. Some elements of the UI will still be mismatched. To fix the rest of it, open gconf-editor. (Press alt-F2 to bring up the run dialog, then type in gconf-editor.) Find org.gnome.desktop.interface and the scaling-factor setting, and change it to 1. Sadly, there are no options except integers 1 or 2, I think if it were able to accept 1.5 it would be perfect. Maybe this is a change that will be made in the future. Reboot or log out/back in for the settings to go into effect completely.
Installing Fedy and Extra Software
If you go here you will see a fantastic tweak tool that someone wrote that really helps the post-install process. You can use it to add custom (restricted) repositories, install Google Chrome, and a ton of other useful things. Run this command to install it (all on one line):
bash -c 'su -c "curl http://folkswithhats.org/fedy-installer -o fedy-installer && chmod +x fedy-installer && ./fedy-installer"'
This tool has several categories of options. When it installs, it will add the rpmfusion repositories, which will allow you to install many other apps. You can also install things like Steam and Chrome. When my previous article was written, I was very much a Chrome user but have since switched to Firefox. I also like to install the bash option, which makes the terminal prompt look better and use colors, which is helpful.
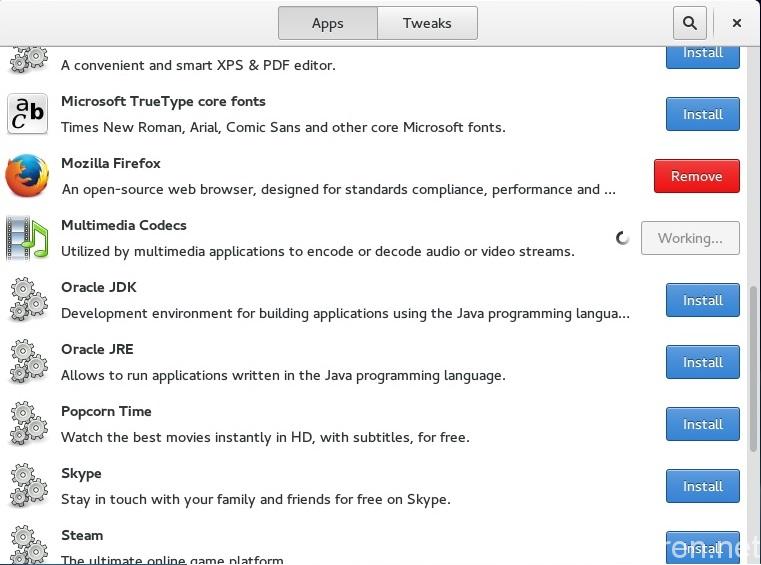
There are also SSD options if you have an SSD that will help. I also like to install the Numix icon set and theme, which you can then enable in the tweak tool. You can find fedy in your list of applications, or just run the command “fedy” from the terminal. Some of my other favorites are Sublime Text (a fantastic text editor) and MP3 support if you have a music collection. (The below picture isn’t from the newest version, so yours may look slightly different. The way you use it hasn’t changed.)
Install Other Applications
You can install anything that you like…but I have a few things that I like to add that I use from time to time. I try to remember to add them at the outset.
- Vim – a better version of vi (terminal text editor)
- Terminator – a terminal emulator I prefer to the Gnome terminal
- Geany – a graphical text editor
- htop – a terminal-based system monitor
To install:
sudo dnf install vim terminator geany htop
Add Favorite Applications to…Favorites
This is easy, but saves plenty of time in the future. In the application view (click the icon with the 4 squares on the dock) you can right-click on any application that you will use frequently. It will add it to the dock on the bottom (if that’s where you set Dash to Dock to put it).
Now you’re done!
That’s about it for me. Anything past this is up to you and completely dependent upon what you’re going to be doing with your computer. Leave a comment below if you have any questions or suggestions.